
Before we get into it, the short version:
- Pocket doors recover floor area by eliminating the swing arc, which can reclaim up to nine square feet in small bathrooms.
- A pocket door’s useful opening depends on its finished width, trim, and the location of nearby fixtures; confirm the finished opening will work for daily access before committing.
- Quality soft-close pocket door hardware costs more upfront but reduces long-term adjustment needs and improves reliability in high-moisture environments.
- The space gain only materializes when the adjacent wall can accept the pocket system without rerouting plumbing or relocating electrical switches.
- Routing shower plumbing behind a pocket door wall requires thicker framing than standard kits, which increases lumber costs and reduces adjacent room space.
- Local codes may require minimum clearance in front of toilets and walk-in tub doors, which can make pocket doors valuable when swing arcs block required zones.
- Bathroom layouts can fail when pocket door placement forces plumbing into exterior walls where freeze risk becomes a concern.
Related Video
Watch: Pocket Door Framing for a Small Bathroom by Bathroom Remodeling Teacher
The door becomes a layout problem before it’s a hardware problem
A standard swing door needs clearance for its arc in a small bathroom. That’s space you need for stepping out of the tub, positioning the vanity, or reaching the toilet without contortion. At Flippin’ Rustic, we work with Tampa Bay homeowners during the design consultation to figure out whether a pocket door makes sense before we frame the rough opening. The shower valve, vanity placement, and door strategy have to work together.
Eliminating the arc can open new fixture-placement options. But only when the wall beside the opening can accept the pocket system without rerouting plumbing or moving light switches. A narrow pocket door may feel restrictive once trim is applied, so confirm the finished opening will work for daily access before committing. The space gain is useful only when the installation doesn’t create a different constraint.
Clearance gains that actually matter
A pocket door can recover usable floor area in tight bathrooms. That area can let you shift a vanity closer to the shower, choose a larger vanity cabinet, or create a clearer route between a walk-in tub and the toilet. The improvement is most noticeable when the existing door must be closed before someone can enter the shower or transfer from the tub.
Hardware quality affects whether that clearance remains useful over time. Soft-close mechanisms cost more than basic ball-bearing hardware, but they reduce adjustment needs and help the door operate consistently in a humid room. The wall assembly also matters. If it shares space with shower plumbing, the framing may need additional depth for valve cartridges and serviceable pipe routing. In that situation, the correct wall design has to be established before the pocket unit is ordered.
Planning the layout for a walk-in tub and shower
We measure walk-in tub and shower placement before finalizing the pocket door wall because the floor space gained from eliminating the swing matters only if it lands where people move. Bathroom layouts can fail when the pocket door location forces plumbing reroutes or pushes the shower valve into an exterior wall where freeze risk becomes a concern.
Start by sketching the existing bathroom footprint to scale on graph paper or with a free floor-plan tool. Mark the main drain stack, water supply lines entering through the floor or wall, and exterior walls. Walk-in tubs need adequate straight wall length for the tub itself and room in front for transfer access. Shower stalls also need a workable footprint, with larger sizes generally easier to use and tile. If the current door crosses one of these movement zones, a pocket configuration deserves consideration.
Fixture clearances that determine pocket door value
The pocket door earns its cost only when the reclaimed swing arc solves a real circulation or fixture-placement problem. Measure from the existing hinge to the toilet centerline, vanity edge, and tub entry. If the arc blocks the toilet clearance or transfer zone, moving the door into the wall can open compliant placement options without moving the fixtures. If the swing clears those areas, the pocket door may not be solving a layout constraint worth the added framing. Only after the door-swing problem is established should you assess plumbing and electrical conflicts; those conflicts determine whether deeper framing or professional design review is justified.
Local codes vary, but clearance in front of toilets and walk-in tub doors may be required for compliant transfers. The sliding panel can make a tight room workable without expanding the exterior walls, provided the receiving wall is free of incompatible utilities and local requirements are confirmed. Confirm the vent stack, vanity supplies, and shower valve location before committing. Routing shower plumbing behind a pocket door wall can require larger framing than a standard kit, adding lumber cost and taking space from the room on the opposite side.
Choosing the right pocket door system
When you’re working through bathroom remodels with walk-in tubs and showers, the hardware determines whether the panel remains smooth years after installation. Consider the finished door weight, traffic level, and exposure to moisture.
Ball-bearing tracks can suit lightweight hollow-core doors in low-traffic powder rooms. Walk-in tub bathrooms usually receive heavier use and may benefit from solid-core doors for sound dampening. Premium soft-close systems cost more than basic tracks, but correctly rated components reduce premature wear and the need to open a finished wall for repairs. Match the track and rollers to the actual finished weight rather than selecting by door size alone.
Track material matters in humid spaces
Choose the track material based on the manufacturer’s rating for humid locations and the expected exposure near a walk-in tub or shower. Steam and condensation may collect around the opening, so verify that the specified track and rollers are rated for that environment before installation.
A level track is also easier to maintain while the surrounding wall is being finished. Fastening the upper track with screws instead of nails allows small corrections if the first placement isn’t perfectly level. That adjustment should happen before the door and trim conceal the assembly.
Door width and clearance gains
A pocket door’s useful opening depends on its finished width, trim, and the location of nearby fixtures. Wider panels require wider cavities, so compare the desired access opening with the wall length available beside the bathroom entrance. The installation documented in a small-bathroom remodel used the pocket configuration to remove the swing conflict, but the exact area recovered depended on the vanity and tub positions.
Coordinate the rough-in before tile work if walk-in tub plumbing must pass through the same wall. The track can be protected temporarily, but the valve, supplies, and framing need to be complete before the surface materials conceal them. This is especially important when deeper framing is needed for a modern cartridge and the pocket cavity.
Framing the pocket: structural changes you need to know
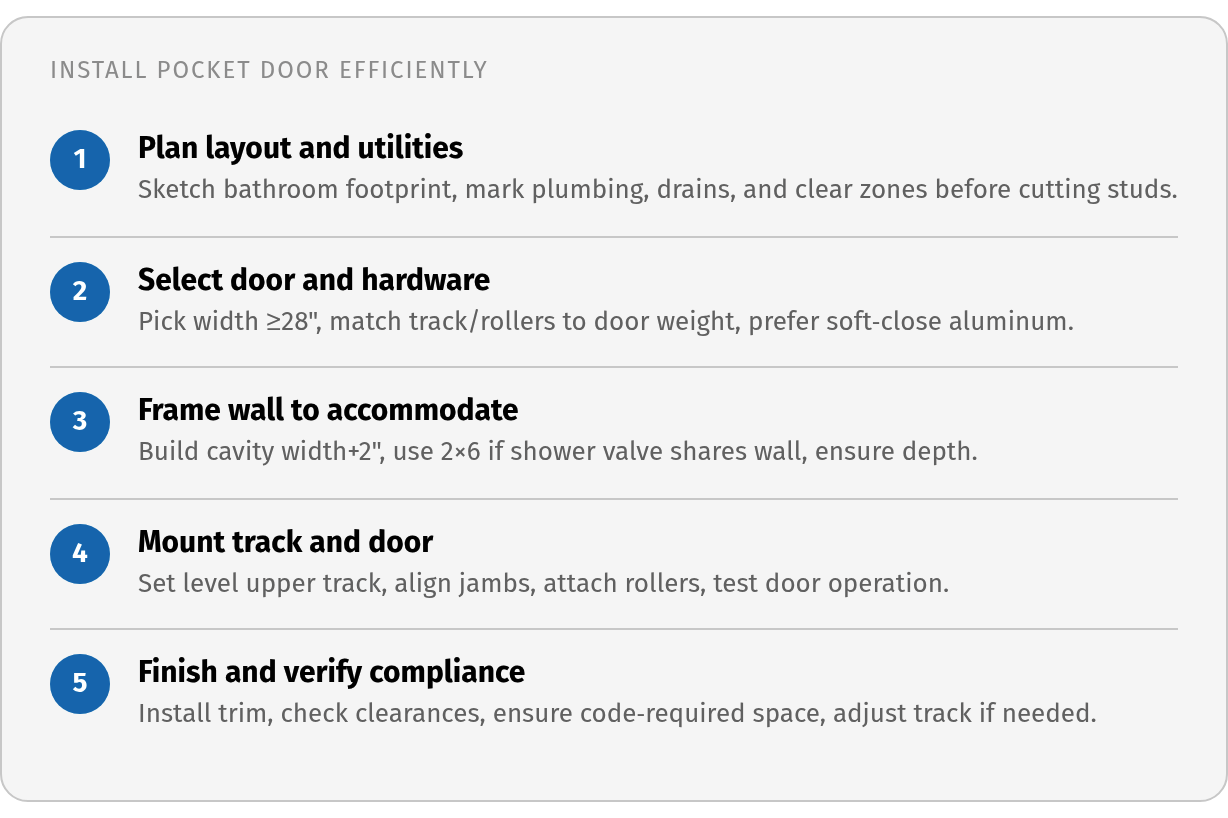
When you’re coordinating bathroom remodels with walk-in tubs and showers, the pocket cavity demands more wall depth than many homeowners expect. A standard 2×4 wall may not provide enough room once the track, rollers, door, and plumbing are considered. Most pocket door kits require the door width plus 2 additional inches for hardware clearance. A shower valve in the same wall creates a three-way conflict among plumbing, framing, and door travel.
Wider framing can resolve that conflict and stiffen the wall around the cavity, which is useful when the panel is solid-core rather than hollow-core. Deeper framing may help keep the valve from being pushed into an exterior wall. One installer working on a small bathroom retrofit added a 2×4 wall inside the pocket frame after the prefabricated kit showed deflection against the shower-wall support.
Sequencing plumbing and framing decisions
The wall plan should begin with the existing drain stack and supply lines, not with the pocket-door kit. If the tub or shower places utilities beside the opening, decide whether to deepen the wall or reroute those lines while access is available. Walls with plumbing cannot house a pocket door unless the lines are deliberately placed outside the hardware’s travel zone.
Mark the utilities on a scaled plan before cutting studs. If the valve occupies the same framing bay, use deeper floor plate and wall framing to provide room behind the cavity. When it lands in an adjacent bay, standard 2×4 framing may be adequate, subject to the chosen kit’s dimensions. Cabinet placement deserves its own review. One contractor with two decades of framing experience identifies cabinet screws that enter the cavity as a major source of binding, so plan blocking and fastener lengths before cabinets are installed.
Installing the pocket door unit
During pocket door installation, the rough opening must account for the panel, track, rollers, and manufacturer’s clearance. Confirm whether the manufacturer measures from the finished wall, framing, or king stud before laying out the opening. When the shower valve shares the wall, upgrading to 2×6 framing can keep the rough-in from colliding with the pocket assembly.
Setting the track and jamb dimensions
Install the upper track at the height specified by the manufacturer and verify its level across the entire span. An out-of-level track forces the door to roll uphill, which can lead to binding and repeated adjustments. Use a screw rather than a nail at the center so the position can be fine-tuned without splitting the header lumber.
The jamb depth must match the finished wall thickness, including drywall on both sides. Standard 2×4 walls produce a 4½-inch jamb, while 2×6 walls need a 6½-inch jamb to sit flush. Check these dimensions against the trim profile before closing the wall. Correcting a mismatch later can require removing finished casing.
Hardware capacity and track alignment
Select the track and rollers for the actual finished weight of the chosen door. Solid-core doors can be heavier than hollow-core panels, so use a suitable capacity rather than relying on a generic bathroom-door kit. Check that the rollers sit perpendicular to the track before hanging the panel.
If cabinets will be mounted above the vanity, 2×6 framing provides adequate anchor depth while reducing the chance that fasteners enter the travel path. Test the door 20–30 times during the final walkthrough. Repeated operation can reveal a small alignment problem while the track and trim remain accessible.
Finishing, code compliance, and the value of a pro
Track alignment determines whether the finished door glides quietly or drags against the frame. Check the upper assembly at multiple points with a long level, then inspect the jambs for plumb before installing casing. A professional installer can also verify that the finished opening, transfer area, and fixture arrangement satisfy applicable local requirements rather than treating the pocket door as an isolated carpentry project.
Hardware capacity should exceed the finished panel weight, particularly when a solid-core door is chosen for privacy and sound control. Undersized hardware may wear out or fail early on larger or heavier doors. Select corrosion-resistant components, keep the track accessible for adjustment, and make sure the final trim doesn’t prevent future roller service.
Why plumbing depth should be resolved before drywall
The pocket cavity and shower valve often compete for the same wall. Modern shower valve cartridges may require more wall depth than a standard 2×4 frame provides, so the choice between rerouting the plumbing and deepening the framing must be made before the wall is closed. This is particularly important in small bathrooms where an exterior-wall route could create freeze-risk concerns.
Cabinet screws penetrating the pocket cavity can cause binding doors. Keep cabinet and drywall fasteners within their permitted lengths, and mark the no-penetration zone for anyone working on the wall after installation. A screw that reaches the track or panel may not be noticed until the door is operated repeatedly.
Rough-install the pocket frame and any plumbing that must pass through the same wall before tile work; the valve, supplies, and framing need to be complete before the surface materials conceal them. If the manufacturer’s sequence requires early track or door installation, protect those parts from tile debris, grout, and tool strikes. Final door adjustment and trim installation should follow tile work so the finished door is aligned to the actual wall surfaces rather than an unfinished substrate.
References
[1] Pocket Doors in Bathrooms: Pros, Cons, and Where They Work Best – https://thefortressbuilders.com/pocket-doors-in-bathrooms-pros-cons/
[2] How to Install a Pocket Door – The Home Depot – https://www.homedepot.com/c/ah/how-to-install-a-pocket-door/9ba683603be9fa5395fab9017ce871af
[3] What Is a Pocket Door? Pros, Cons, and When to Use One – https://doorsandbeyond.com/blogs/blog/what-is-a-pocket-door-pros-cons-and-when-to-use-one?srsltid=AYCX9vL2C5jAvcuP9RxpY29lhRtN7RBQ5KbqNF14DbukdNfgRsQ_H_c8
[4] What Are the Benefits of Professional Pocket Door Installation? – https://hhiwindows.com/what-are-the-benefits-of-professional-pocket-door-installation/
[5] Why 2×6 pocket door framing and interior plumbing routing matter … – https://www.instagram.com/reel/DdO7pwAlfZk/
[6] Best Practices For Installing Pocket Doors | The Build Show Network – https://buildshownetwork.com/library/best-practices-for-installing-pocket-doors
[7] Pocket Door Framing for a Small Bathroom – YouTube – https://www.youtube.com/watch?v=-f0cJvEP5go
[8] 6 Must-Knows for Installing Pocket Doors | Pro Remodeler – https://www.proremodeler.com/construction/article/55189253/6-must-knows-for-installing-pocket-doors
Quick Questions, Straight Answers
1. Can I install a pocket door if my shower valve is already in the wall next to the door opening?
Possibly, but the wall must be opened and its framing depth evaluated before the pocket unit is selected. The valve, supply lines, and door hardware need separate, serviceable space. If they compete for the same bay, a deeper wall or a plumbing reroute may be required; do not assume a standard pocket frame will accommodate both.
2. Why do some pocket doors bind or stop sliding smoothly after a few months?
Fasteners are a frequent cause. Cabinet and drywall screws that extend into the cavity can catch the panel or track, while an initially misaligned track places extra load on the rollers. Moisture can worsen the problem if the hardware is not rated for humid bathroom conditions, so hardware selection and careful protection during finishing both affect long-term movement.
3. Should I install the pocket door before or after the tile work is finished?
Follow the manufacturer’s required sequence, but keep the track and rollers protected during tile installation. Grout, dust, and impacts can contaminate or damage the moving parts. Many projects complete the rough framing and plumbing first, protect any installed hardware, and perform final adjustment after the wall and tile surfaces are finished.
4. How do I know if eliminating the door swing will actually solve my bathroom layout problem?
Draw the room to scale and mark the hinge, toilet, vanity, tub entry, and transfer areas. Then trace the existing door arc. If that arc occupies a required movement or clearance zone, sliding the door into the wall may solve the conflict. If it does not interfere with circulation, the extra framing and hardware may provide little practical benefit.