
Why Storm Damage Restoration Matters
When wind or rain punches through your roof in Tampa Bay, the clock starts on hidden moisture damage. Mold can grow quickly in wet materials. That’s not a scare tactic. That’s how Florida buildings work, and it’s why emergency mitigation and retrofit planning must happen in parallel rather than sequentially. The damage you see from the driveway is rarely the full story. Thermal imaging often shows wet insulation behind drywall that feels dry when you touch it. Standing water in wall cavities doesn’t announce itself until the baseboard buckles.
What Happens When Storm Damage Goes Unrepaired
Leaving storm damage unaddressed creates a cascade. Ongoing moisture accelerates wood rot and compromises structural framing. Pest entry points open up where flashing pulls away or soffits tear loose. If you’re planning to sell, unrepaired storm damage tanks buyer confidence and triggers inspection failures. We’ve seen deals stall over roof stains and ceiling discoloration that started as a single missing shingle during hurricane season. The longer you wait, the more trades you need and the harder it becomes to isolate what’s covered under your policy versus what’s now pre-existing.
Storm damage restoration isn’t a single-trade job. A typical post-storm scenario involves structural breach, water intrusion, wind-driven debris impact, and potential electrical exposure all at once. Coordinating multiple specialists as separate contracts can drag a restoration job out. A licensed general contractor centralizes assessment, permitting, trade scheduling, repairs, and close-out. You get one point of contact instead of juggling five invoices and three timelines.
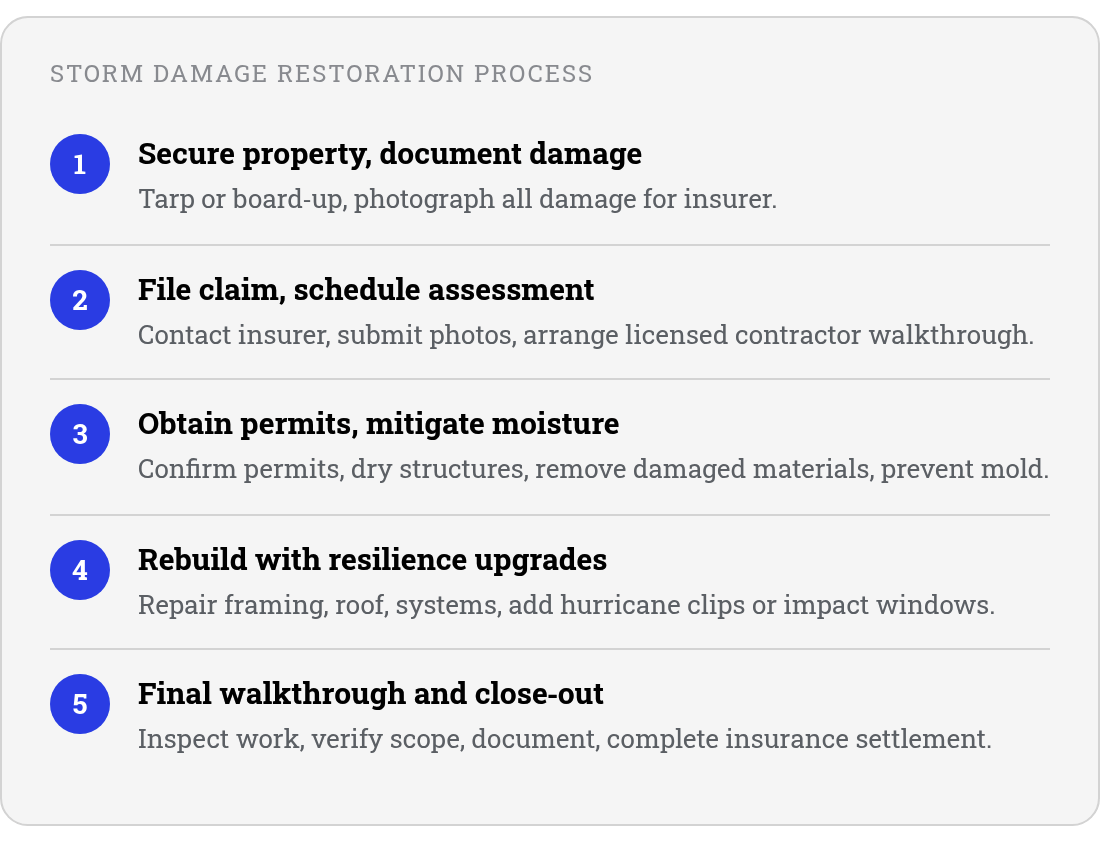
The standard sequence in Tampa Bay: secure the property with tarps or board-up, document damage with photos for your insurer, contact your insurance company and file the claim, schedule an owner-led licensed contractor assessment, confirm permits and scope with the local building department, complete mitigation and repairs, then walk through the finished work and close out the project. Homeowner involvement is high during documentation and insurer contact, medium during scope review, and low once repairs begin. Most restoration teams offer 24-hour emergency response for immediate tarping and water extraction, which buys time before the full rebuild starts.
The Short Version
-
Treat a storm breach as both a repair problem and a moisture-control problem, especially in Tampa Bay’s humid climate.
-
Delayed repairs can affect structural integrity, resale confidence, inspection results, and insurance clarity.
-
Use a licensed general contractor when the work involves multiple trades, permits, mitigation, and reconstruction.
-
Reconstruction is often the practical time to add roof-decking, connector, gable-end, and opening-protection upgrades before the walls close up.
Secure the Property & Prevent Further Damage
Step onto your property only after you confirm it’s safe. Look for sagging ceilings, buckled walls, or doors that no longer fit the frame. Stay out if you notice those signs. Electrical damage and standing water create hidden dangers. Tampa Bay’s recurring severe storms produce conditions that require professional assessment before you enter. If you see or smell smoke, or if the lights flicker when you flip the switch, call an electrician before you step inside.
Check the visible roof line from the ground. Missing shingles, torn flashing, or exposed plywood mean water is already moving through the roof deck. Walk the perimeter and note where you see dark stains spreading across the ceiling or pooling in light fixtures. Place a bucket under active drips, but don’t climb a wet or damaged roof to patch it yourself. Falling through a compromised deck is more common than most homeowners expect.
Even after the active leak slows, the building still needs quick stabilization. Wet rooms should be isolated from unaffected areas where possible. Air movement should be controlled by the restoration crew. Porous materials should be evaluated before anyone assumes they can stay in place. In Florida buildings, a small opening can push moisture deep into assemblies that were never designed to stay wet.
Temporary Control Measures You Can Take Safely
Move valuables, electronics, and documents out of wet areas immediately. Unplug appliances in rooms with standing water. Shut off the water main if flooding came from a burst pipe rather than the roof. If a small opening in a window frame or door jamb can be covered from inside the house without reaching over your head or leaning out, tape a plastic sheet over it to stop wind-driven rain. Larger breaches, roof tarps, and board-ups require equipment and fall protection most homeowners don’t have on hand. Call a licensed contractor with storm-damage experience rather than attempting those repairs yourself.
Ground-Level Safety Checks
Keep a safe distance from downed power lines, even if they appear inactive. Avoid rooms where outlets, switches, or breaker panels show water damage. Turn off the main breaker if you can reach it safely. Leave the home immediately if you notice gas odors, structural instability, or electrical sparking. Once the immediate hazards are identified from a safe location, begin building a simple claim record: exterior photos, interior photos, notes on when the storm hit, and a list of rooms affected. That record helps emergency crews understand the path of water intrusion before extraction and drying equipment are set up.
Get a Licensed, Owner-Led Assessment & Estimate
After you secure the property and stop active water intrusion, bring in an owner-led licensed contractor who can assess the full scope of damage and coordinate every repair phase from emergency mitigation through final close-out. That’s where the Florida buildings code licensing system protects you. A properly licensed general contractor must pass exams, carry insurance, and maintain a visible license number you can verify. Look for that license number on the contractor’s website, proposal, or truck before you sign anything. A valid general contractor license in Florida carries the CBC prefix followed by seven digits.
What You Should Expect During the Walkthrough
A licensed contractor will walk through the affected areas with you, document visible damage with photos, and explain what needs to happen next. The contractor should identify which materials need to be pulled versus dried in place. They should explain the difference between mitigation work—emergency drying, containment, temporary protection—and reconstruction work: rebuilding walls, replacing flooring, repainting. Those are often billed separately. You need to understand which phase covers what before the crew arrives.
The written estimate should break down each phase of work in plain language. If the proposal includes allowances, those are budget placeholders for items you haven’t selected yet, like new tile or light fixtures. You’ll make those selections later. If the actual cost exceeds the allowance, you’ll see a change order: a written approval for the difference in price, schedule, or scope. That same change-order process applies any time you decide to upgrade materials or add work after the original estimate. Get every scope change in writing.
Red Flags That Signal an Unlicensed or Storm-Chasing Crew
If a contractor knocks on your door immediately after a storm, asks for a large cash deposit, or can’t produce a license number on the spot, walk away. Storm chasers move through neighborhoods fast, collect upfront payments, and vanish before the work is finished. A reputable licensed contractor will provide a written scope, a payment schedule tied to completed milestones, and a local office address you can verify. Pressure for immediate decisions or vague company details are signs you’re dealing with someone who won’t be around to fix problems later.
The Restoration Roadmap: Permits, Mold, Build, and Close-Out
Once your estimate is approved, the real work begins. Storm repairs often require permits for structural, roof, electrical, or plumbing work. Rather than assume processing times or generalize requirements, check with your local building department to confirm what triggers a permit in your Tampa Bay municipality. Permit rules vary by city and scope. Getting this step right prevents shutdown orders mid-project and keeps inspections on schedule.

Mitigation and permitting may move on separate tracks, but they have to be coordinated. A crew may need to open walls, remove damaged baseboards, or expose framing before the final repair scope is clear. That early work gives the contractor and insurer a more accurate view of what was actually affected, and it makes retrofit planning concrete while the framing is open. The permit process determines which repairs need formal inspection before the home is closed back up.
The Build Sequence After Mitigation
Once the structure is dry and permits are in place, reconstruction follows a predictable path: framing or structural repairs, roof and exterior dry-in, mechanical, electrical, and plumbing rough-ins as needed, insulation and drywall, then finishes. This order prevents rework and keeps inspections in the right sequence. It also creates a logical checkpoint for resilience upgrades aligned with published wind-retrofit guidance for residential buildings. If you’re already replacing roof decking or reframing wall assemblies, adding hurricane straps, continuous load-path connectors, gable-end bracing, or impact-rated sheathing and opening protection becomes a straightforward upgrade rather than a separate retrofit project. We walk you through these options before drywall goes up, when the work is most cost-effective.
After finishes are installed, the punch-list walkthrough confirms completed work against the original scope. We check for incomplete items and verify finish details. Keep your own photo record throughout: wide shots, close-ups, multiple angles, good lighting, and timestamps where possible. Document damaged personal property, fixtures, appliances, finishes, and visible structural elements, along with approximate age and purchase records if available. That inventory simplifies insurance reconciliation and protects you if secondary claims arise later.
References
[1] Tampa Water Removal and Water Damage restoration – https://www.servpro.com/locations/fl/tampa-water-damage-restoration
[2] 24/7 Emergency Storm Damage Restoration in Tampa Bay – https://drycor.com/services/storm-damage-restoration/
[3] (PDF) Wind Retrofit Guide for Residential Buildings – https://www.researchgate.net/publication/382097300_Wind_Retrofit_Guide_for_Residential_Buildings
FAQ
1. What should I do if my contractor wants to start repairs before the insurance adjuster arrives?
Wait for the adjuster before reconstruction begins, but do not postpone emergency protection. Temporary tarping, board-up, water extraction, and removal of clearly saturated materials are part of preventing additional loss. Take photos before crews begin, keep the mitigation invoice, and save any notes about when the damage occurred so the adjuster can review the emergency work with context.
2. Can I add hurricane upgrades to my storm repair without triggering a full code-compliance retrofit?
Confirm the plan with your local building department before the estimate is finalized, because added work can affect engineering, permit review, inspection timing, and the final approved scope.
3. How do I verify a contractor’s license after a storm when multiple crews are knocking on doors?
Use the contractor’s listed license information to search the Florida Department of Business and Professional Regulation database before signing. Compare the business name, license status, and contact details against the proposal you received. A legitimate contractor will give you time to verify credentials, provide a written estimate, and tie payments to completed milestones rather than pressure you into an immediate cash deposit.